Carbon Front Bumper Overlays: Acura Integra Type S Stick-On Mod
Carbon fiber overlays that stick over the Integra Type S's gloss-black front bumper trim, so you get carbon protection instead of PPF without pulling the bumper. Clean the area, peel the backing, stick it on. John rates the fit about 8 out of 10.
Full video (7 min): Integra Type S Carbon Front Bezels | Carbon Competition Package? · John's YouTube channel
Get the parts
- Search Amazon for JOGON Acura Integra Type SSearch on Amazon ↗
- Carbon front bumper overlays for the Integra Type S (AliExpress, link from the description)Buy ↗
As an Amazon Associate I earn from qualifying purchases. Some links are affiliate links.
Carbon fiber overlays that stick over the Integra Type S's gloss-black front bumper trim, so you get carbon protection instead of PPF without pulling the bumper. Clean the area, peel the backing, stick it on. John rates the fit about 8 out of 10. This 7 min guide covers the Carbon fiber overlays for the gloss-black front bumper trim on.
Overview
The gloss-black trim on the front bumper of John's Integra Type S had been picking up nicks, and people told him to PPF it. Instead he covers it with carbon fiber overlays. Because they go over the factory piece, you don't have to take the front bumper off (he says even a dealer can struggle to get that bumper back on nicely), and the carbon is light but still protects the paint underneath. The install is clean the area, peel the backing off the tape and stick the part on. The trickiest bit for him was working the back edge around his existing front lip, so stick part of it first and then work it around. On fitment he gives one side about 9 out of 10 and the worst spot about 7 out of 10 (it sits a little wide), so 8 out of 10 overall: not OEM-perfect, but he points out the factory piece has a 2–3 mm gap too, and any small gaps are against black trim, so you won't notice from five feet away. With the carbon lip and Jogon fog bezels, he says the front end now looks like a competition package.
Vehicle & fitment
- Product
- Carbon fiber front bumper trim overlays (front bezels) for the Acura Integra Type S
- Shown on
- Acura Integra Type S (DE5, John's car, with a carbon front lip and Jogon carbon fog bezels already fitted)
- Carbon fiber overlays for the gloss-black front bumper trim on the Acura Integra Type S (AliExpress listing linked in the video description)
- Stick-on overlay with pre-applied double-sided tape; no bumper removal
- There's a cut-out around the bumper sensor on one side
Always confirm fitment for your exact year and trim with the seller before buying.
Tools & parts
Tools
- Cleaner and a clean cloth to prep the surface
- Plastic trim tool if you need to work around a front lip (optional)
Parts
- Carbon fiber front bumper overlays (left and right) with pre-applied tape
Video chapters
- 0:00Project introduction
- 1:58Driver side installation
- 3:56Passenger side installation
- 4:50Final review and closing
Step by step
- 1
Why an overlay▶ 0:55
The gloss-black trim on the front bumper picks up nicks. Instead of PPF, the carbon overlay covers it, adds some protection, and doesn't require removing the bumper.
- 2
Clean the area▶ 1:51
Clean the factory trim where the overlay will sit so the tape bonds.
- 3
Peel and stick▶ 2:00
Pull the backing off the double-sided tape and press the overlay on. It wraps tight and snug around the corner.
- 4
Check the fit▶ 2:22
John's driver side was about 9 out of 10 at the corner and 7 out of 10 at the worst spot. There's a cut-out for the bumper sensor.
- 5
Do the other side▶ 3:48
Repeat on the passenger side. The factory piece isn't perfect either: it has about a 2–3 mm gap.
- 6
Work around the lip▶ 6:00
If you have a front lip, getting the back edge on is the trickiest part. Stick some of the adhesive first, then weave the rest around.
Tip: Without a front lip it's even easier.
- 7
Verdict▶ 6:18
About 8 out of 10 overall. The weave and finish look good, and from five feet away you won't notice the small gaps.
Wiring notes
- No wiring: stick-on carbon trim.
- Uses the pre-applied double-sided tape; no drilling and no bumper removal.
Get the parts
- Search Amazon for JOGON Acura Integra Type SSearch on Amazon ↗
- Carbon front bumper overlays for the Integra Type S (AliExpress, link from the description)Buy ↗
As an Amazon Associate I earn from qualifying purchases. Some links are affiliate links.
FAQ
What vehicle does this install fit?
It is shown for the Carbon fiber overlays for the gloss-black front bumper trim on the Acura Integra Type S (AliExpress listing linked in the video description). Stick-on overlay with pre-applied double-sided tape; no bumper removal Always confirm your exact year, trim and factory audio with the seller.
How long does the install take?
John's full video is 7 min. Plan on that much time for a careful DIY install, plus extra if you are new to dash work.
What tools do I need?
Tools called out in the guide: Cleaner and a clean cloth to prep the surface; Plastic trim tool if you need to work around a front lip (optional).
Where do I get the parts?
Use the buy links on this page for the unit and any harnesses John used. Some links are affiliate links.
Is this beginner-friendly?
The guide breaks the job into 7 steps with timestamps into the video. If you can remove trim panels carefully, you can follow along.
John's Acura Integra Type S
More photos →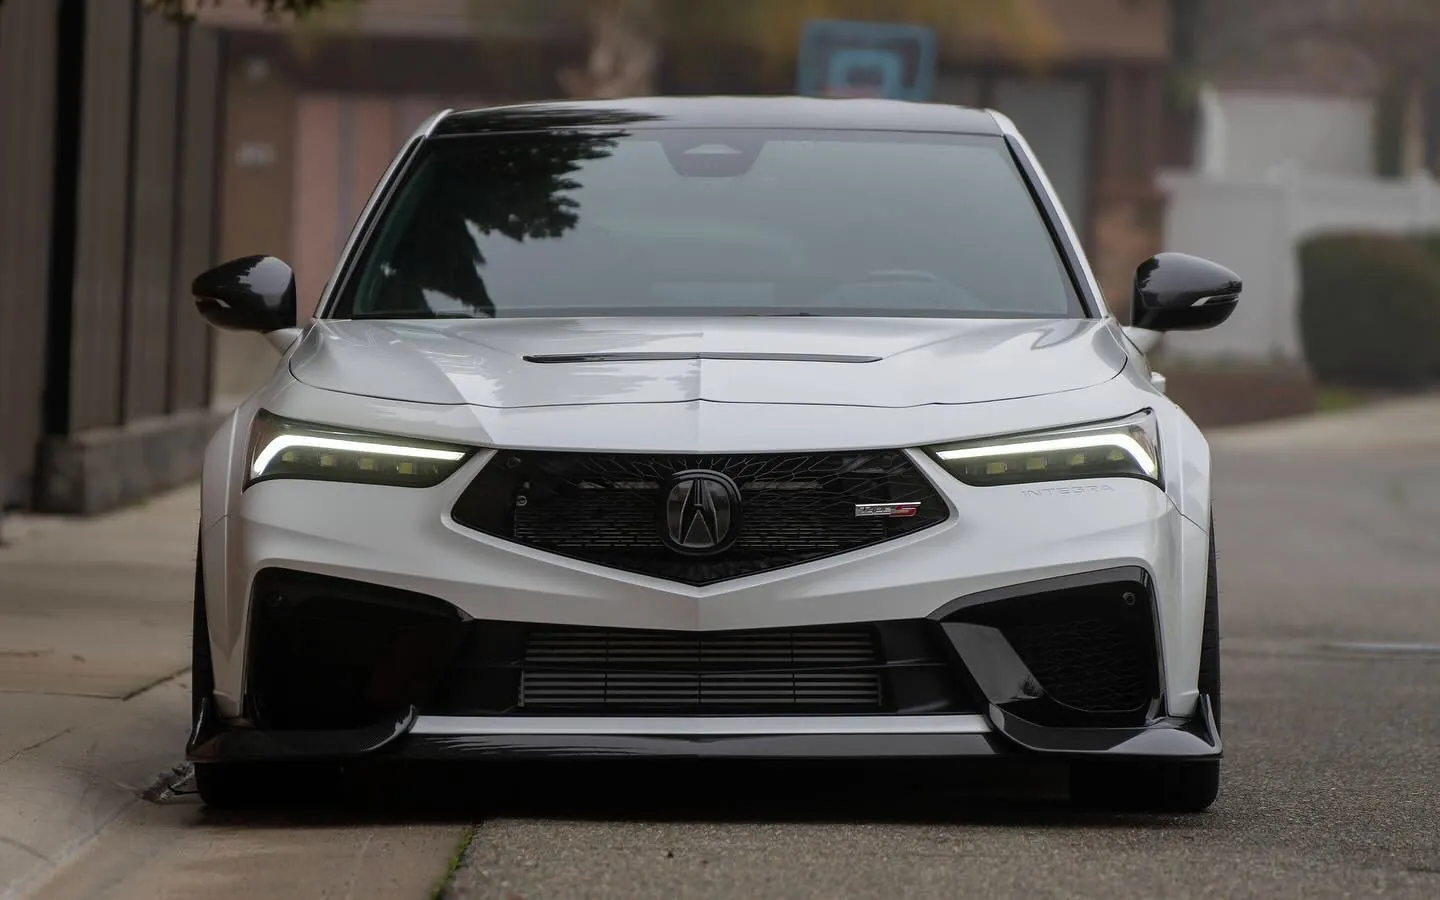
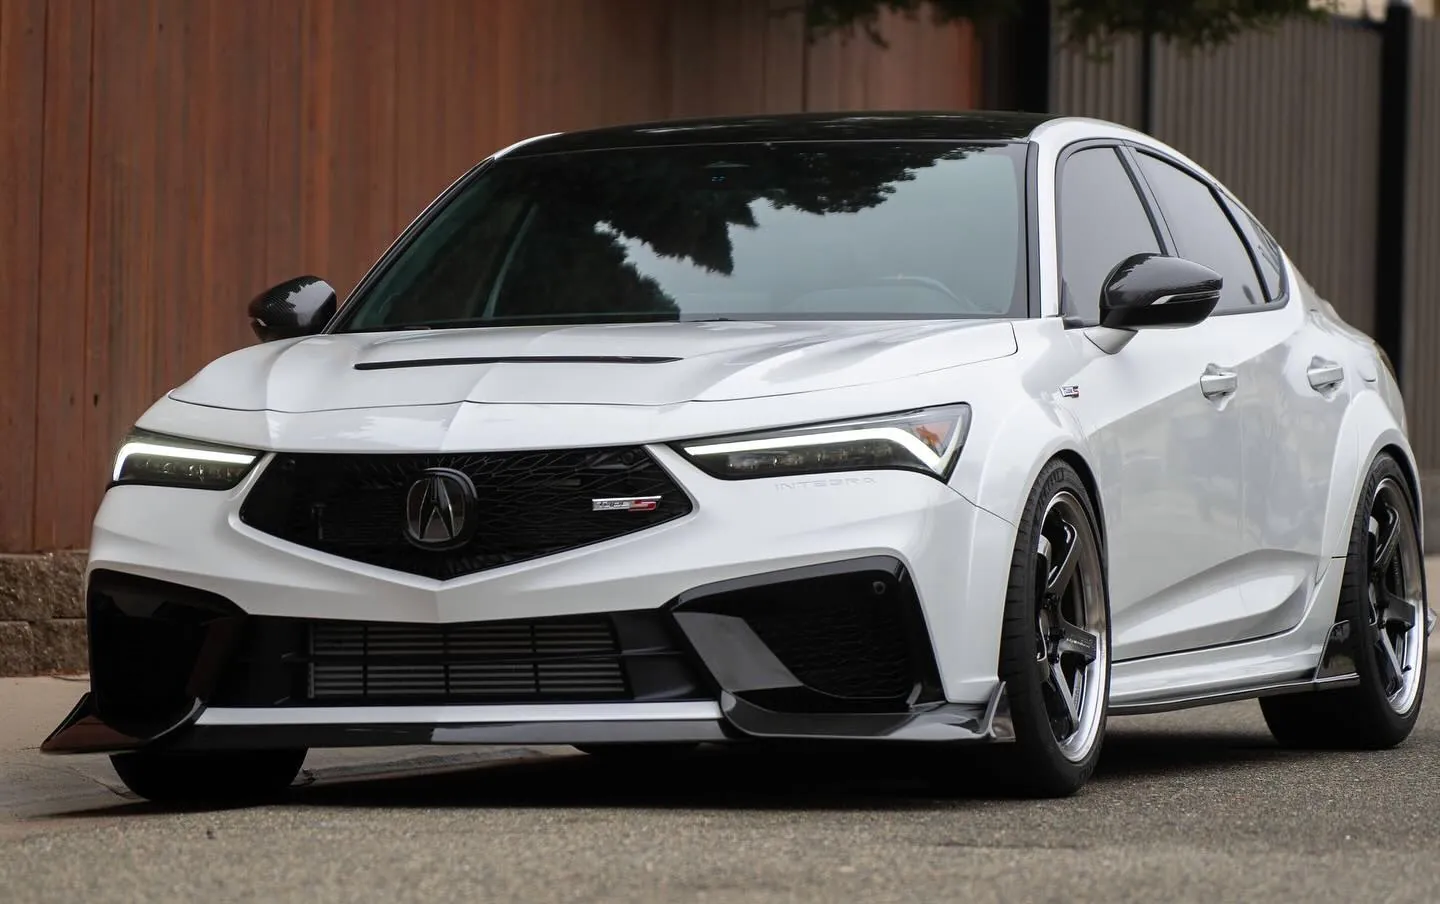
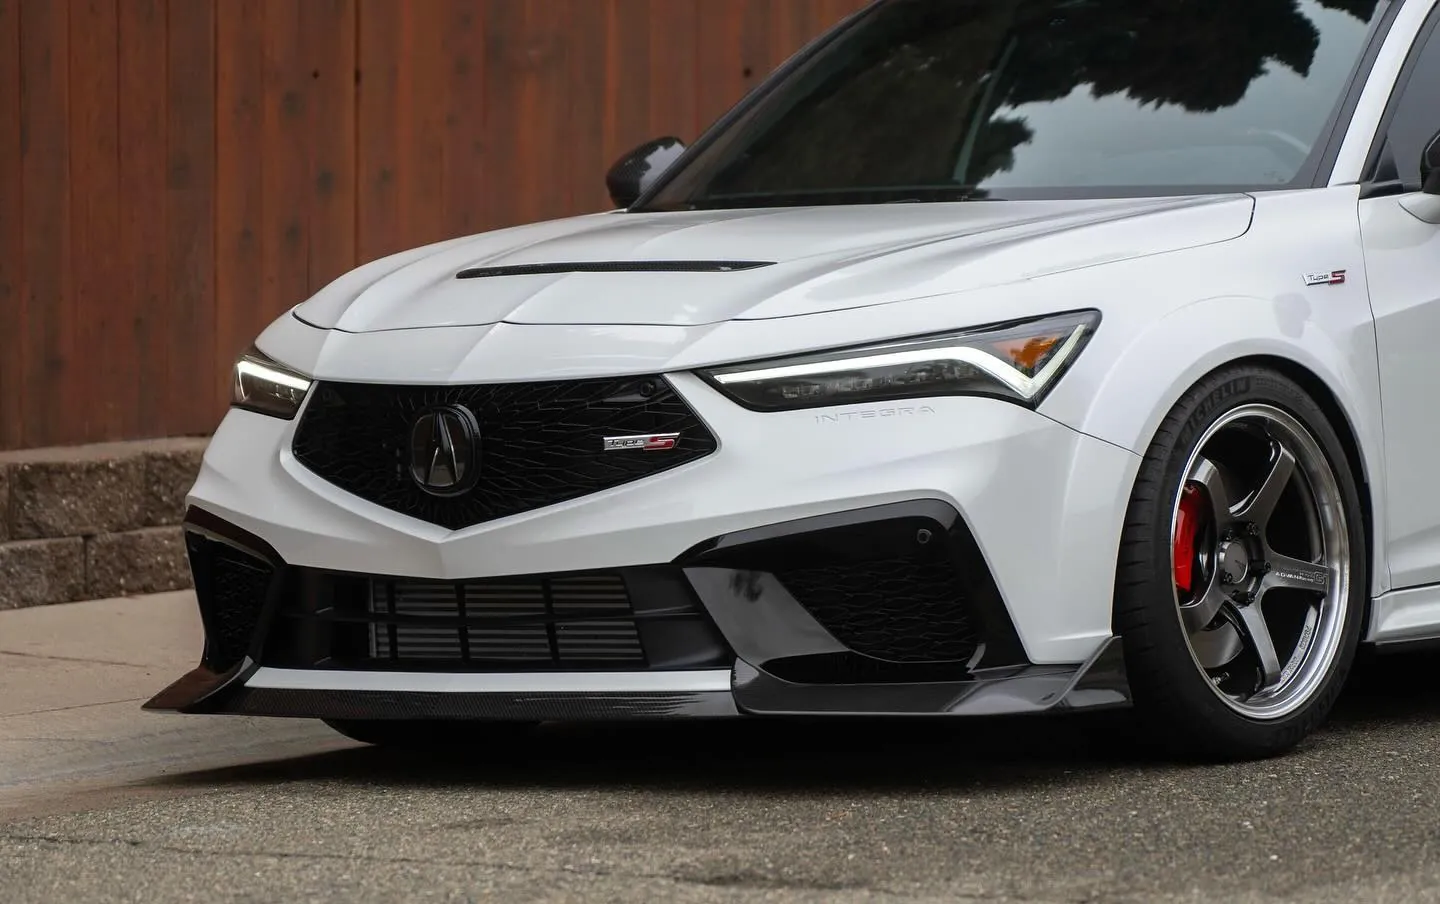
Photos from @ngooyen on Instagram. Follow for more.
Full transcript
Show the full transcript (71 lines) +
0:00What's up guys, it's your boy John, it's this video on the Integra Type, that's
0:29got a new part so as you're gonna see it I'm already pretty carbon fiber out and
0:30so as you're gonna see I'm already pretty carbon fiber out and I took these things to meet the
0:36and take your type best. Hey it was a hit it was probably the one one of the most interesting
0:42what's a new car so when people see it modified they're really interested. Inside and out it's
0:48all like pretty carbon fibered out so going with that theme some of my black the black
0:57gloss black right here has been taking some nicks some people told me PAPF it whatnot
1:03but hey instead of PPFing it I'm gonna replace it with some overlaying it with carbon fiber trim
1:10which will go right here go right over I got the carbon fiber lip so I gotta remove that
1:15but these are really cool because instead of taking your front bumper off
1:20even the dealer can't get this bumper on back nicely so
1:26having a overlay for me is huge because I don't need to take the front bumper
1:32makes the install super easy now this is really lightweight very lightweight
1:38and and at the same time durable and it will also technically protect your car too from
1:43any more dents and stuff like that and uh yeah I love the way it sweeps and curves and
1:50I will show you guys how the install is pretty easy just clean the area un-stick and then stick on the
1:57new part all right I have all the little stickies kind of pulled out let's get this on here
2:00All of the little stickies kind of pulled out and let's get this on here.
2:19Alright so let's talk about the fitment.
2:22On this side of these it wraps all the way around here very tight, very snug, there is a little
2:29holding on good perfect fit me right
2:35here right here I would say
2:40could be a little bit better right there
2:45I know there's a little sensor right here
2:47so the other make a little cut out but
2:49I would say this fit me right here is like
2:568 out of 10
2:58I mean it's not OEM obviously and 9 out of 10 right here and overall it looks
3:04nine out of ten right here and overall it looks really good now you can kind of see some of
3:10the black right here which is fine because it's black but um I would say right there is probably the worst
3:20offender great fit me right here so they may be a sanded it a little bit too much right here
3:26um let's say seven out of ten right here overall I'll give it bit meant wise
3:35nice eight out of ten not OEM and um yeah but looks pretty good I'm gonna do the other side and get some nice
3:47glamour shots just I just wanted to go over fitment at least on the driver's side um there you can see a
3:53bunch of double sided tape but let me get to the other side I wanted to show you the fitment of the
3:59, the OEM one also not the best right here um I guess of course there's some rock chips the rock
4:10chip right here so this bad boy will definitely protect it the the clear coat is definitely
4:17stronger than whatever this finishes a little bit soft but yeah it's good for protection as well
4:23all right here's the Jogon front lip it looks great with the jogans front fog
4:31Also, it looks very good.
4:34Now, man, it's so carbon now in the front now.
4:38It looks very, looks like a competition package
4:41or something like that.
4:42Cause it's just, it's mean.
4:48Fitment wise, I would say
4:51say it's 8 out of 10, the other side fit a little bit better and I talked to one of
4:58my friends, reach out to me, shout out to you Richie, you know you are, but he said
5:04he said his fitment is not great on a competitor's carbon fiber floor replacement so
5:11there you have it he said that I'm like yeah my fitment 8 out of 10 not bad at all
5:17the carbon weave and everything is really nice the finish is really nice
5:21it's just uh if you look at the I mean you look at the OEM fitment this is like
5:26two three mil gap right here which is not the best but right here this is where the fitment
5:30But right here
5:31This is where the fitment so it looks really good up here
5:35You look good and then right here. There's a little you can see a little bit, but then again, it's black
5:41s. So it's not that. That noticeable same right here
5:46you even a full replacement. It's like I have the best fit man. Oh, yeah, I'm not the best fit man
5:50This is actually really good eight out of ten
5:55Not complaining didn't have to remove your front bumper if you don't have a front lip it'd be really
6:00I would say the trickiest part is trying to get that back lip on.
6:05So have some of the adhesive on, stick it on, and then try to weave it around there.
6:12But yeah, here's the worst side when it comes to fit me.
6:18I would say right here is like a 7 out of 10. It's a little bit wider, which is
6:24unfortunate, but other side is great.
6:27This side is great
6:28overall I mean if you're standing five feet you're not gonna notice but yeah
6:34carbon fiber and now instead of PPF you can have a carbon fiber to protect your
6:40front bumper
6:41very interesting thank you guys for watching and catch you guys in the next one
6:44see you
6:58You
Machine-transcribed from the full-length video and lightly cleaned (product names fixed). Watch the video for exact wording.
Next step


