Pre-Preg Dry Carbon Front Lip: Acura Integra Type S (DE5) 12-Clip Install
A three-piece pre-preg (dry) carbon front lip for the 2023+ Integra Type S that reuses the OEM mounting points: three button clips on each side piece and six clips on the center piece, plus double-sided tape. No front bumper removal.
Full video (7 min): Affordable & BEST Front lip for the Integra Type S DE5 | Pre-Preg Carbon Fiber · John's YouTube channel
Get the parts
- Clip and trim removal tool set: Generic pickGeneric pickBuy ↗
- Pre-preg carbon front lip for the Integra Type S (AliExpress, link from the description)Buy ↗
As an Amazon Associate I earn from qualifying purchases. Some links are affiliate links.
A three-piece pre-preg (dry) carbon front lip for the 2023+ Integra Type S that reuses the OEM mounting points: three button clips on each side piece and six clips on the center piece, plus double-sided tape. No front bumper removal. This 7 min guide covers the Listed for the Acura Integra Type S 2023–2025 (AliExpress listing linked in the video.
Overview
John fits a three-piece pre-preg carbon front lip to his Integra Type S. He thinks it's the best-looking lip available right now. The carbon is rigid but has some give, so it can take a hit, and it's very light. It reuses the OEM mounting points: each side piece has three button clips plus a strip of adhesive, and the center piece has six clips plus double-sided tape, so 12 clips in total. He's not usually a fan of three-piece lips, but this design looks seamless once it's on. Pop the three button clips on each side with a pry tool or flat head, start the piece at one corner and work it in, then press the clips back. One of his push-clip holes was a little tight, so he spent a few seconds opening it up with a file. On the center piece, put all six clips in first with the tape half-peeled, then peel the tape from the middle outward and hold about 10 pounds of pressure for around 15 seconds. The lip doesn't overhang much, the side pieces flow into the fog-light bezels, and he finished it with a ceramic coat (optional). His verdict: very easy, and you don't need to remove the front bumper.
Vehicle & fitment
- Product
- Pre-preg dry carbon fiber three-piece front lip for the Acura Integra Type S (DE5)
- Shown on
- Acura Integra Type S 2023–2025 (DE5, John's car)
- Listed for the Acura Integra Type S 2023–2025 (AliExpress listing linked in the video description)
- Three pieces: two side pieces and a center piece; reuses the OEM mounting points
- Real dry (pre-preg) carbon fiber, glossy finish; the listing says 15–25 days to produce and ship
Always confirm fitment for your exact year and trim with the seller before buying.
Tools & parts
Tools
- Plastic pry tool or flat-head screwdriver for the button clips
- Small file (if a push-clip hole is tight)
- Cleaner to wipe the adhesive areas
- Ceramic coating (optional)
Parts
- Pre-preg carbon front lip, 3 pieces (2 side pieces + center piece)
- Push/button clips (3 + 3 + 6) and pre-applied double-sided tape
Step by step
- 1
Meet the lip▶ 0:32
A three-piece carbon lip. It's rigid but has some bounce, so it can take some hits, and it's very light.
- 2
Mounting points▶ 1:18
Each side piece reuses three OEM mounting points with button clips, plus a strip of adhesive. Wipe those areas clean on both sides.
- 3
Three pieces, one look▶ 1:56
John isn't usually a fan of three-piece lips, but this design looks seamless once it's on.
- 4
Pop the button clips▶ 2:36
The three button clips pop out easily with a pry tool or a flat head.
- 5
Fit the side piece▶ 3:01
Start at one corner and work it in. Don't pull the clips all the way out, just enough to get the piece behind them.
- 6
File a tight hole▶ 3:39
One of John's push-clip holes was a bit small. A few seconds with a file opened it up so the clip pressed in.
Tip: If the clip presses in, it fits.
- 7
Center piece: six clips first▶ 4:37
Keep the double-sided tape semi-peeled and put all six clips in first. Even one clip holds it securely.
- 8
Peel and press▶ 5:14
Peel the tape starting from the middle and fan out, then hold about 10 pounds of pressure for about 15 seconds.
- 9
Verdict▶ 5:43
Very easy: 12 clips in total and no front bumper removal. It doesn't overhang much, and the side pieces flow into the fog-light bezels. John added a ceramic coat (optional).
Wiring notes
- No wiring: clip-on and taped carbon lip.
- Reuses the OEM mounting points; no drilling and no bumper removal.
Get the parts
- Clip and trim removal tool set: Generic pickGeneric pickBuy ↗
- Pre-preg carbon front lip for the Integra Type S (AliExpress, link from the description)Buy ↗
As an Amazon Associate I earn from qualifying purchases. Some links are affiliate links.
FAQ
What vehicle does this install fit?
It is shown for the Listed for the Acura Integra Type S 2023–2025 (AliExpress listing linked in the video description). Three pieces: two side pieces and a center piece; reuses the OEM mounting points Always confirm your exact year, trim and factory audio with the seller.
How long does the install take?
John's full video is 7 min. Plan on that much time for a careful DIY install, plus extra if you are new to dash work.
What tools do I need?
Tools called out in the guide: Plastic pry tool or flat-head screwdriver for the button clips; Small file (if a push-clip hole is tight); Cleaner to wipe the adhesive areas; Ceramic coating (optional).
Where do I get the parts?
Use the buy links on this page for the unit and any harnesses John used. Some links are affiliate links.
Is this beginner-friendly?
The guide breaks the job into 9 steps with timestamps into the video. If you can remove trim panels carefully, you can follow along.
John's Acura Integra Type S
More photos →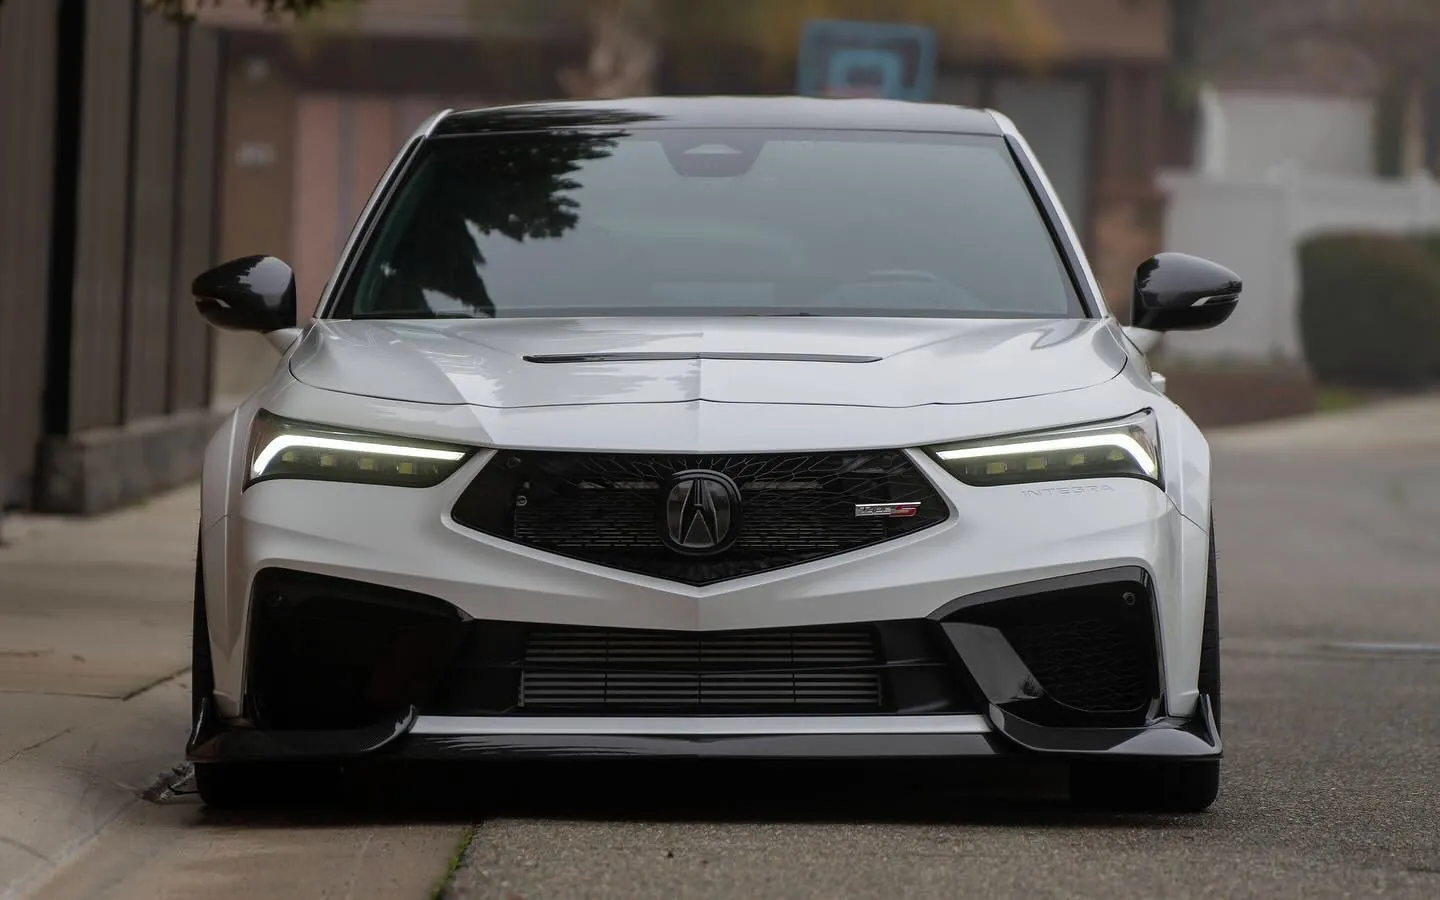
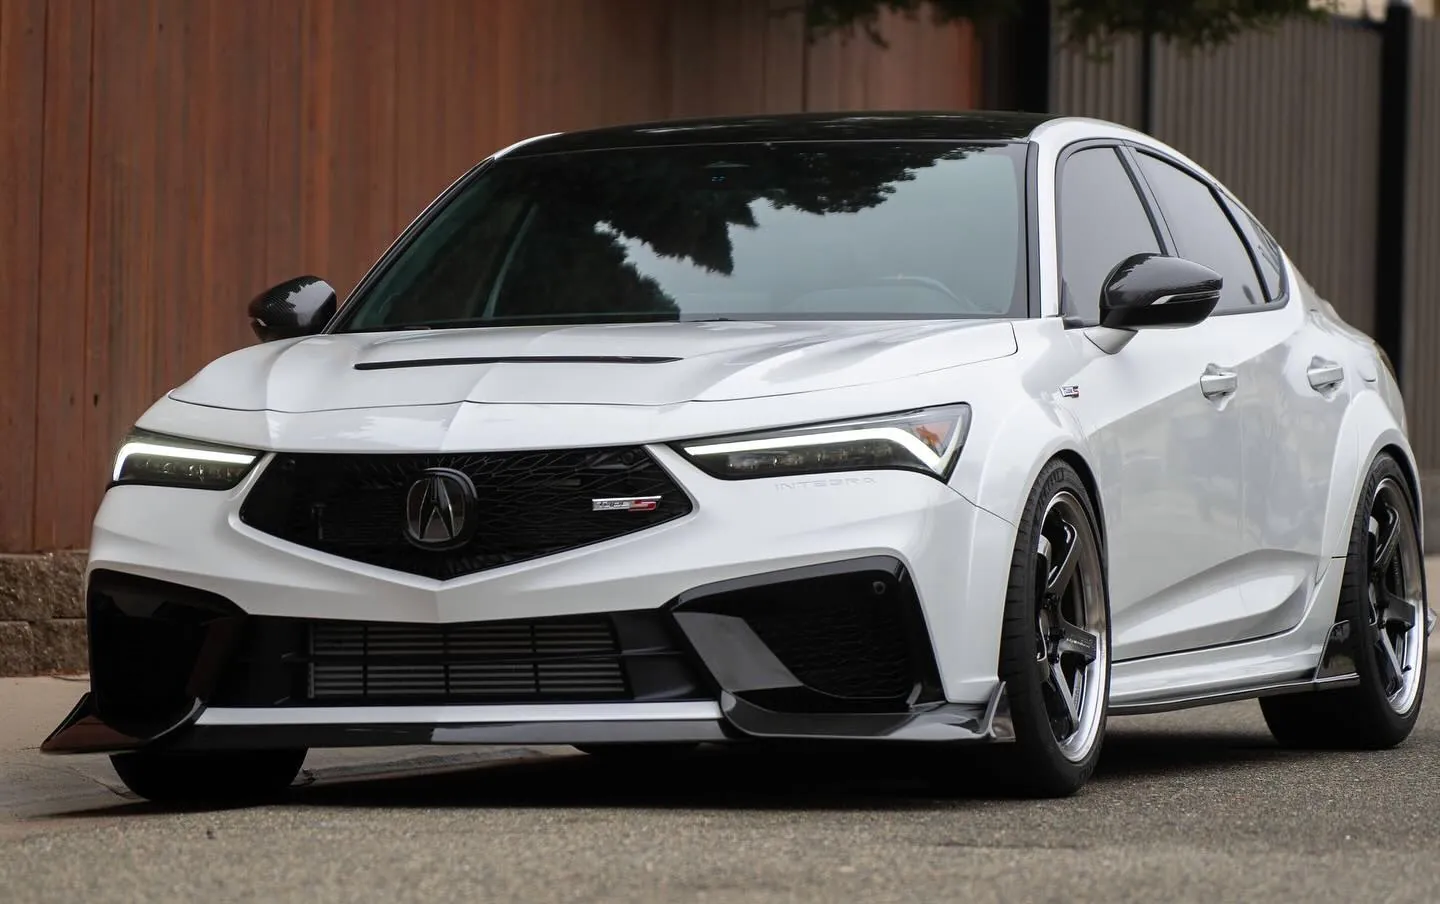
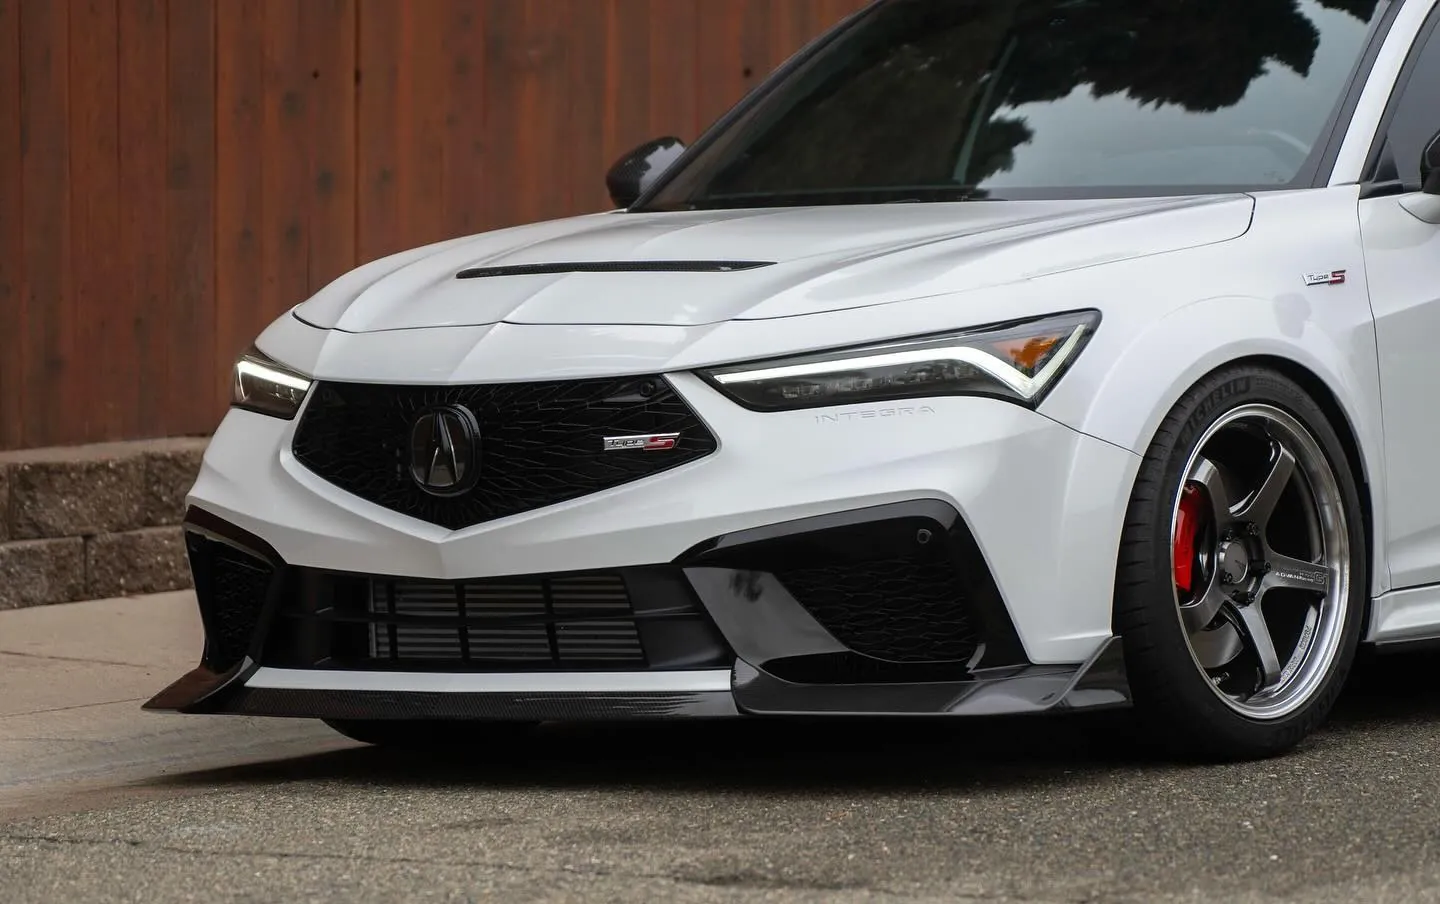
Photos from @ngooyen on Instagram. Follow for more.
Full transcript
Show the full transcript (56 lines) +
0:26What's up spe up, you guys? It's your boy, John. It's your boy John rocking the Type S because we're rocking the
0:31Integra Type S today.
0:32And we've got some new parts coming in like the Integra Type S front lip by Jogon.
0:38Now this is highly anticipated. I think this is the best looking front lip right now.
0:43I'll leave a link down below.
0:47It goes really well. The car fit, it's great
1:18you can see the mounting points right here. One, two, three. And that basically, I don't know if I can get that down here
1:25here.
1:28But there's basically three clips right here. One, two, and three.
1:37So it reuses the O
1:41very light weight, which makes it not to worry too much. And then you have the additional adhesive right here to give it that.
1:48Ooh, they even have some adhesive right there to give it. So make sure you wipe this area. Same goes for the other side.
1:56And then we have the third piece. Now, some people don't like three piece designs, front lips. I'm one of them.
2:03But because of the design of this, you really aren't going to feel like it looks like three pieces because
2:10it looks like this and then that it looks all seamless. So don't frown
2:17that. And the HRC front lip is going to be like that too. So this is the one to go to four.
2:36So, the three button clips here are pretty easy to pop out.
2:47You can see.
2:48You can seeg out.
2:49You can use a pring tool or flat head.
3:01because now you just have to put this in. And the way I generally do it is I
3:06I do something like this where I start at one corner.
3:16I don't take it out all the way just enough where I can pull it.
3:22There you have it. It is on. That means great. I love the way it wraps here.
3:39Now something I something I had to do. It was a little bit my push clips are.
3:44A little bit too fast is I spent like five
3:49seconds and just slightly making this whole little bigger by filing it.
3:53And that made it so the push clip was able to come in.
3:57I'm saying like 10 seconds is just and then you're pushed to be able to
4:02just make sure it fits through. You put it in. You can press it in.
4:13That means it's great. Again, I did use a little file to make it so pretty easy.
4:37You can see? Here are the six clips I have the double sided tape right
4:45here kind of semi-peeled but I want to put the six clips in first.
4:48I'm dong this all one handed because I'm filming y'all.
4:52So one and clip is in. Still have five more to go.
4:57But man that's really nice just having one clip and it's secure like that in the
5:02double sided tape is not even on yet.
5:04I'm telling you it's going to be good. It's going to have great rigidity flexibility
5:09at the same time so like it will be able to take some hits.
5:14All the six tabs placed again. You just peel.
5:20Hope it out a little bit. Start from the middle and fan it out.
5:3615 seconds. Putting about about maybe like 10
5:40pounds of pressure on it.
5:43Alright that pretty much concludes it.
5:46Install was super, easy. Three clips, three clips, six clips, twelve clips, bars.
5:56But yeah very easy to install. Front lip doesn't overhang too much.
6:01This side piece is the aggressive part but it really forms into the fog light
6:09or what absolve.
6:11Or the fog bezers.
6:15It's just an air duck right here.
6:17That meant great. I did put some ceramic coat on it too.
6:25Using sea quartz that's optional.
6:28But this to look good and last long.
6:42Shots and you guys won't regret this. This is a great piece, and you
6:46You know how to remove your front bumper Which scared me for some front lips, but yeah,, thank you guys
6:52Guys for watching catch you guys in the next one peace out
Machine-transcribed from the full-length video and lightly cleaned (product names fixed). Watch the video for exact wording.
Next step


